
Record or drop in a recording, and come back to a document you can check, edit, and keep.
Ritemark 1.9.0 adds Transcribe for meetings, interviews, workshops, and other recorded conversations. It accepts .m4a, .mp3, .wav, .flac, .ogg, and .aac files, then turns them into an editable transcript inside Ritemark. As of v1.12.0, you can also record straight into Transcribe, and search a long transcript while you read it.
You choose how each recording is processed before anything starts. Keep the audio on your Mac with local Whisper, or use ElevenLabs Scribe when you need speaker separation.
Add a Recording
- Click the waveform icon in the Activity Bar.
- Click Add recording, then choose an audio file. You can also drag a file from the Folder view into Transcribe.
- Choose a transcription engine and click Transcribe.
The recording opens in the Transcript Workbench when processing finishes. Click any transcript line and playback starts at that exact moment.
🎉 Your recording is now a working document. You can verify the words against the audio instead of switching between separate apps.
Record Directly
As of v1.12.0, the recording doesn't have to come from somewhere else. Press Record, the button with a dot beside Add recording. The first time, your computer asks whether Ritemark may use the microphone, and the panel shows Waiting for microphone permission… until you answer. If access is denied, the panel says so, and Microphone Settings opens the right page of your system settings on macOS and Windows.
While you record, the panel shows the elapsed time and how much audio has been saved so far. When you finish:
- To keep the recording, press Stop and use. It goes into the same engine choice as an added file, and nothing is transcribed or uploaded until you choose an engine. If you clear that choice, the recording stays where it was saved.
- To throw it away, press Cancel. Once there are more than five seconds of audio, Ritemark asks first, and the file goes to the Trash rather than being deleted.
Where the recording is saved depends on what you have open:
| What you have open | Where the recording goes |
|---|---|
| One folder | A recordings folder inside it |
| Several folders | The folder of the file you're editing, or Ritemark asks which |
| No folder | Ritemark asks where before your first recording and remembers it. The place is shown under the buttons, with Change |
Each recording is its own file, named after the moment it started, like Recording 2026-09-22 14.05.wav. An existing file is never overwritten: a second recording in the same minute becomes Recording 2026-09-22 14.05 (2).wav. It's a standard 16 kHz mono WAV file of about 115 MB per hour, and it is uploaded only if you choose ElevenLabs for it.
A recording is written to disk while it happens, as a .wav.part file next to where it will land. If the panel reloads, or Ritemark quits or crashes in the middle, the audio is kept. The panel then shows Recording interrupted, with Save recording and Discard, and Discard moves the file to the Trash.
A recording stops by itself and keeps what it has if your computer pauses audio input, the microphone is unplugged, or Ritemark can't keep up with saving. A note says why. A notice appears after two hours, and at four hours the recording stops and is saved automatically.
Note: Record keeps everything the microphone hears. There is no echo cancellation or noise suppression, so if you record a call played through your speakers, the other side is recorded too.
Record works on macOS and Windows. Hover over any button in the panel to see what it does, or why it's unavailable. To hide Record, turn off the setting ritemark.features.transcribe-direct-recording. A recording already in progress still finishes.
Choose the Right Engine
Ritemark shows the privacy, speaker, and cost trade-offs before it processes the recording. Nothing runs until you make a choice.
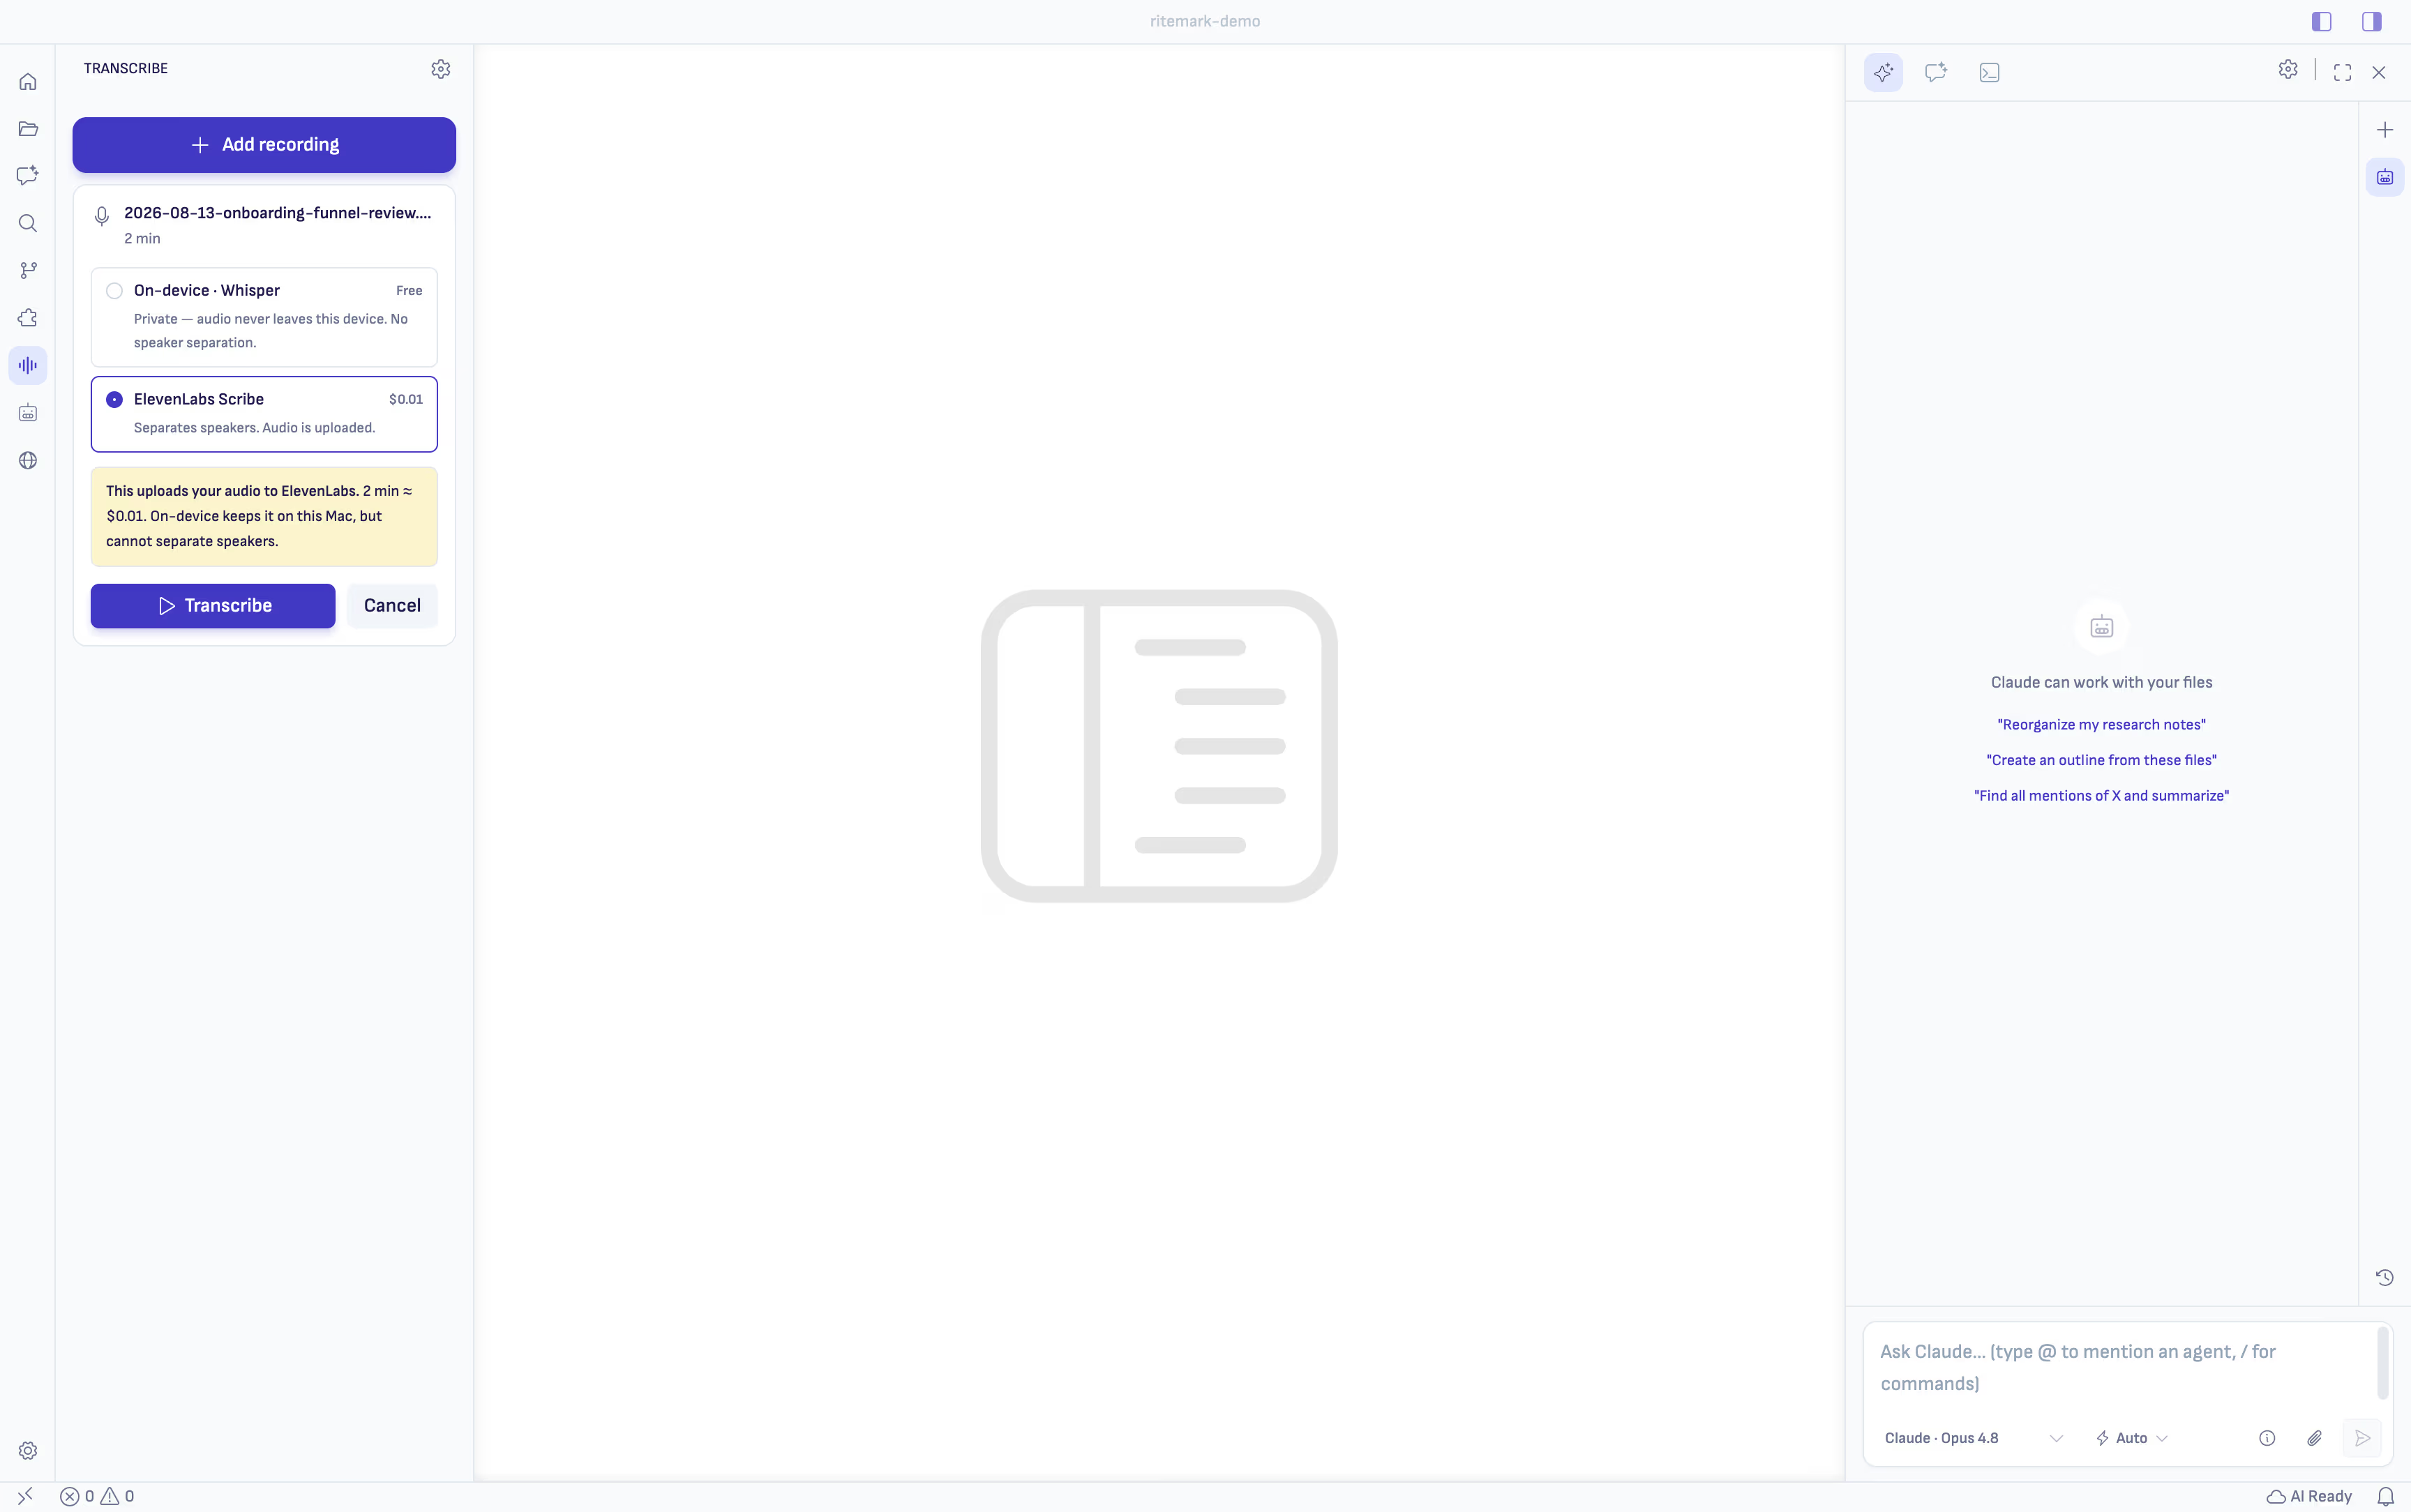
On-device Whisper
Choose On-device (Whisper) when privacy matters most. Transcription is free, and the audio never leaves your computer. This engine doesn't separate speakers, so the transcript won't identify who said each line.
Local transcription currently requires a Mac with Apple silicon. It isn't available on Intel Macs or Windows.
ElevenLabs Scribe
Choose ElevenLabs Scribe when you need speaker separation. Ritemark uploads the audio to ElevenLabs and shows the estimated cost before transcription begins.
Add your ElevenLabs API key under Settings → API Keys before using this engine. ElevenLabs is currently the transcription option on Windows and Intel Macs.
Get and add an ElevenLabs API key
An API key is a private access code for your ElevenLabs account. No programming is required:
- Open the ElevenLabs API Keys page and sign in or create an account.
- Click Create API Key, name it
Ritemark, keep restrictions enabled, and allow Speech to Text. Add a credit limit if you want to cap usage. - Create the key and copy it immediately. ElevenLabs only shows the full value once.
- In Ritemark, open Settings → API Keys and paste it into the ElevenLabs field. Alternatively, click Add key on the ElevenLabs Scribe card in Transcribe.
- Save the key and return to Transcribe. Ritemark will show the estimated cost before you start each ElevenLabs transcription.
Keep the key private, just like a password. If you lose or expose it, create a replacement in ElevenLabs and update Ritemark. See the official ElevenLabs API key guide for current dashboard instructions.
💡 Tip: For a sensitive recording on Apple silicon, choose Whisper. For an interview where speaker names matter, choose ElevenLabs.
| Platform | On-device Whisper | ElevenLabs Scribe |
|---|---|---|
| Mac with Apple silicon | Available | Available |
| Intel Mac | Not available | Available |
| Windows x64 | Not available | Available |
Review the Transcript
The Transcript Workbench keeps the text and recording together. Use the waveform to move through the audio, change playback speed from 1× to 2×, or use the keyboard:
Spaceplays or pauses←moves backward→moves forward
Click a transcript line to play from its timestamp. This makes it quick to check a name, technical term, or quote before you use it elsewhere.
Words with low confidence are highlighted, so you know which parts deserve attention. Both Whisper and ElevenLabs report uncertain words.
Search the Transcript
As of v1.12.0, a search field sits above the transcript. Type a word or phrase and every match is highlighted as you type. Case doesn't matter, and words the engine was unsure about are found too. The count shows where you are, such as "3 of 12", and the arrows, or Enter and Shift+Enter, move between matches. Cmd+F (Ctrl+F on Windows) puts you in the field, and Escape clears it.
Going to a match stops the transcript from scrolling along with the audio, so you can read around it. Back to playing line takes you back to where the recording is and follows it again. The button also appears when you scroll away with the mouse wheel.
Rename Speakers
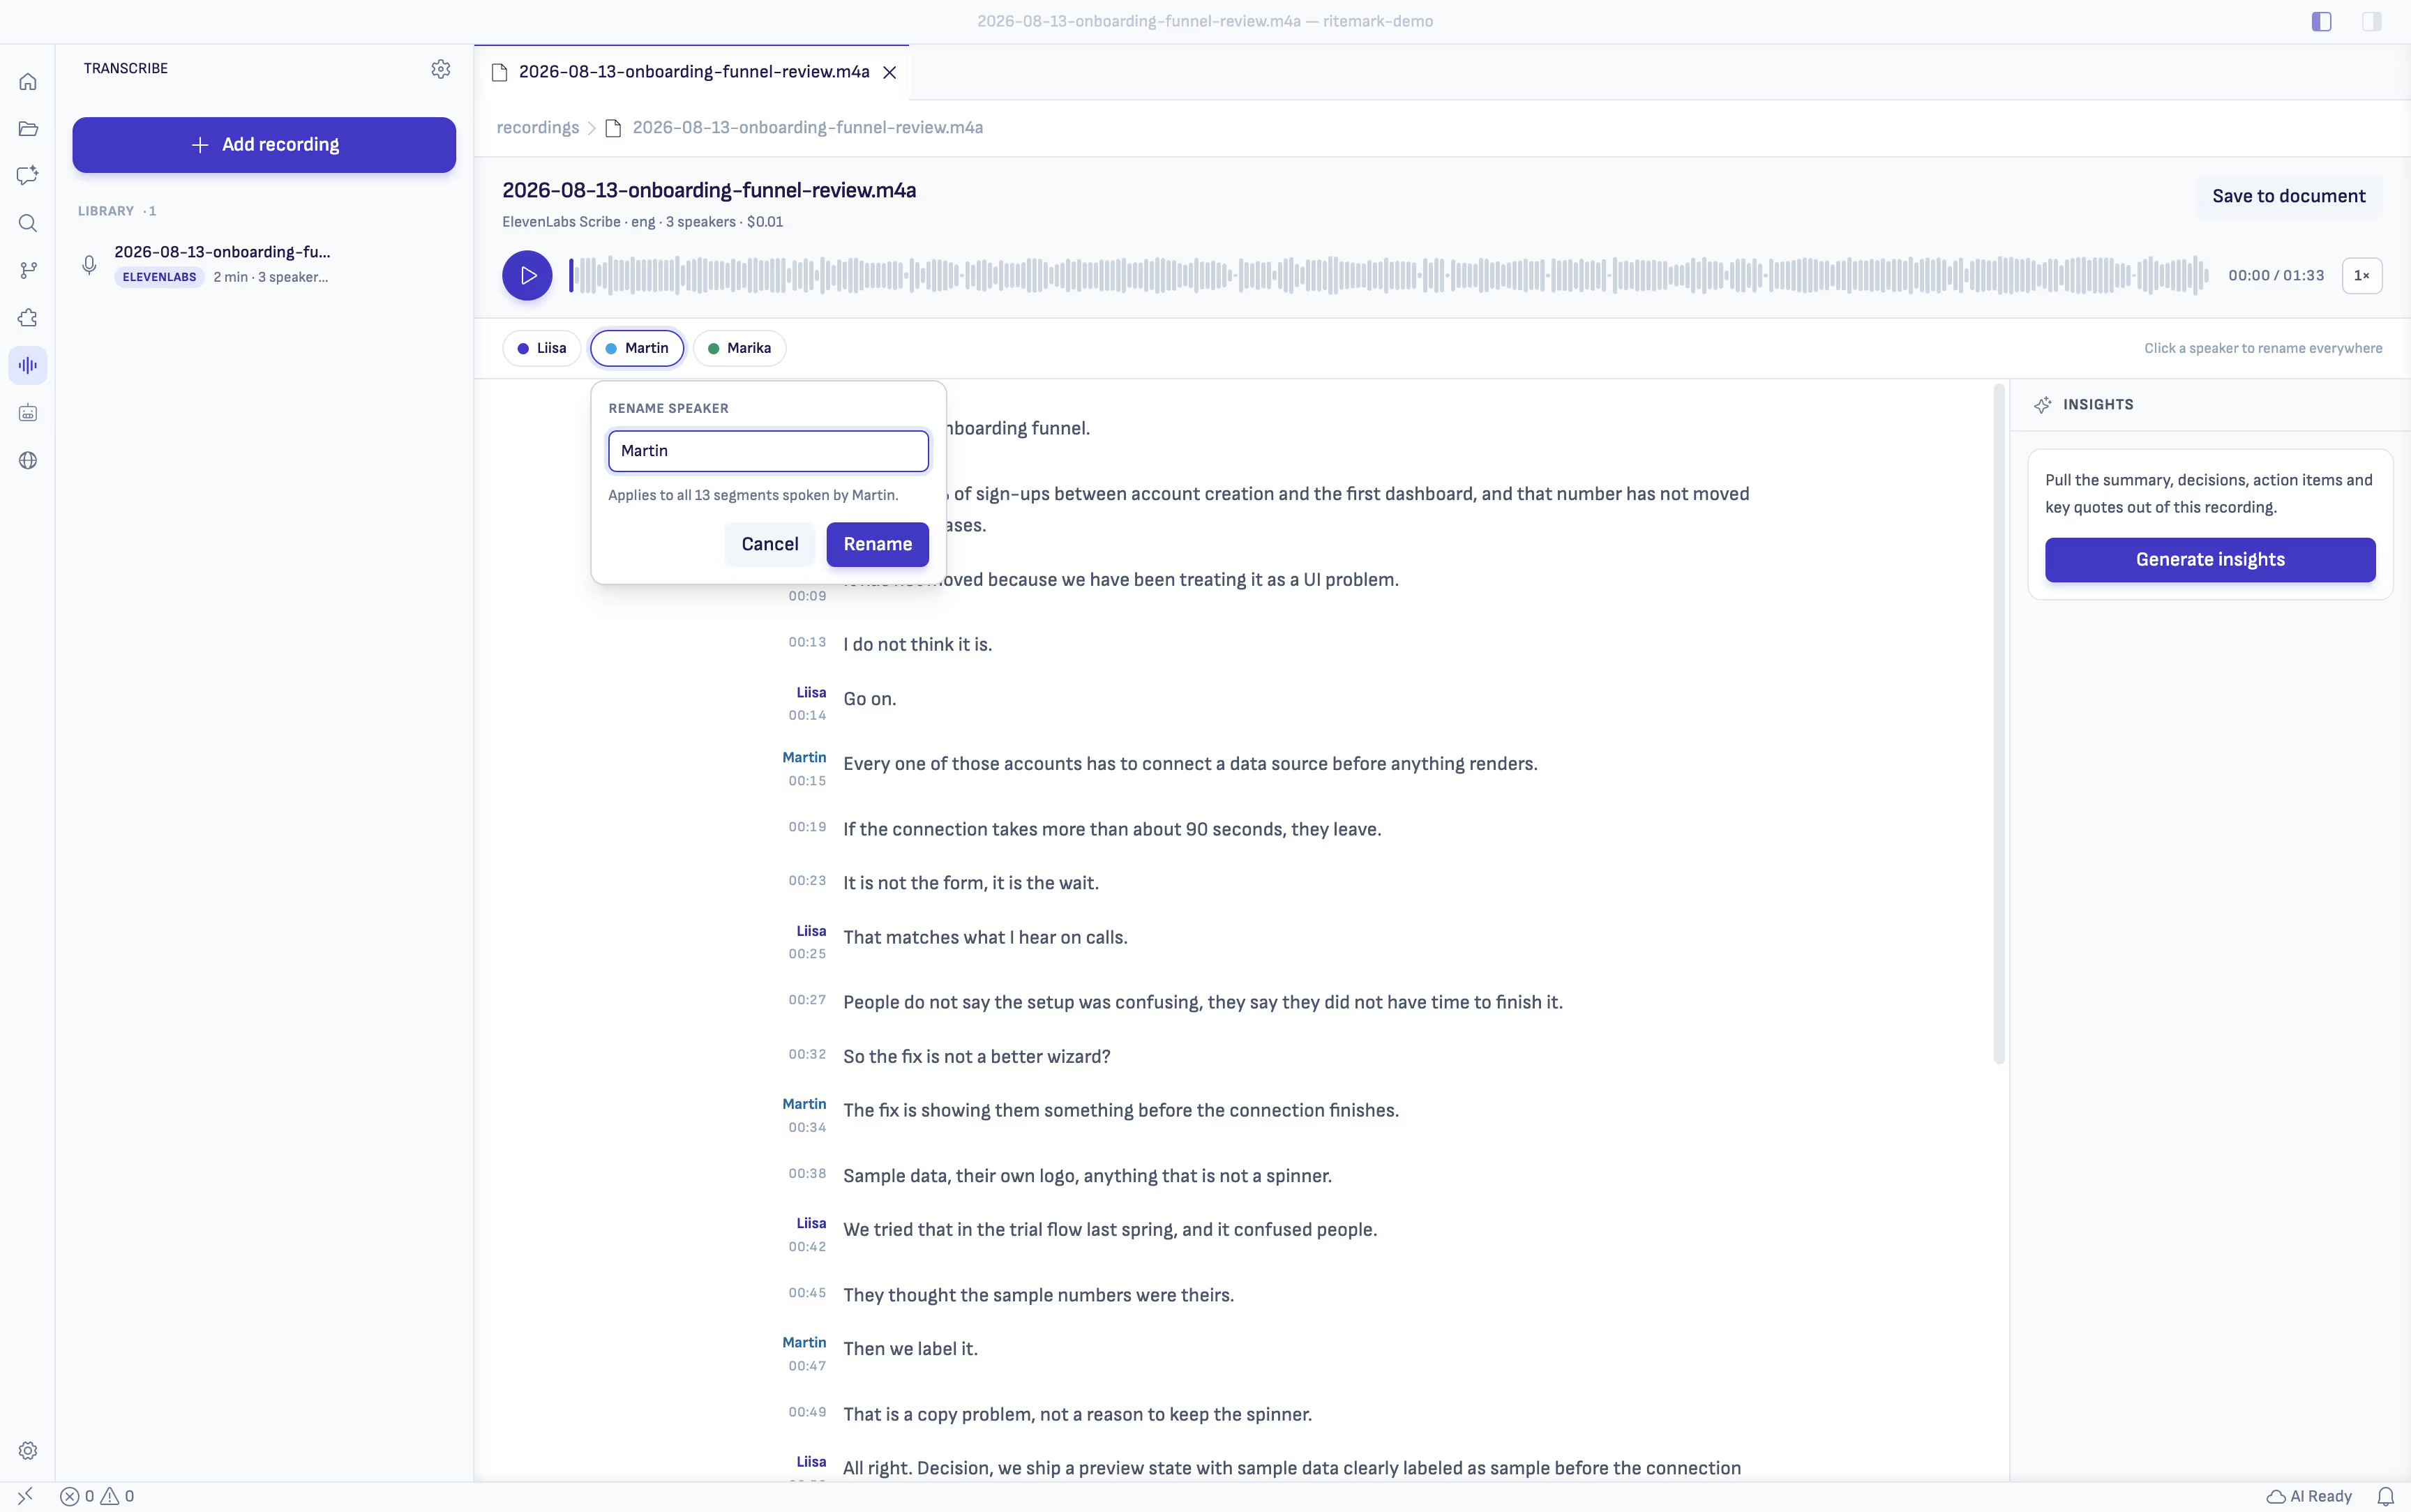
ElevenLabs labels voices as Speaker 1, Speaker 2, and so on. Rename a speaker once and Ritemark updates that name throughout the transcript and the document you save.
Extract Insights With Sources
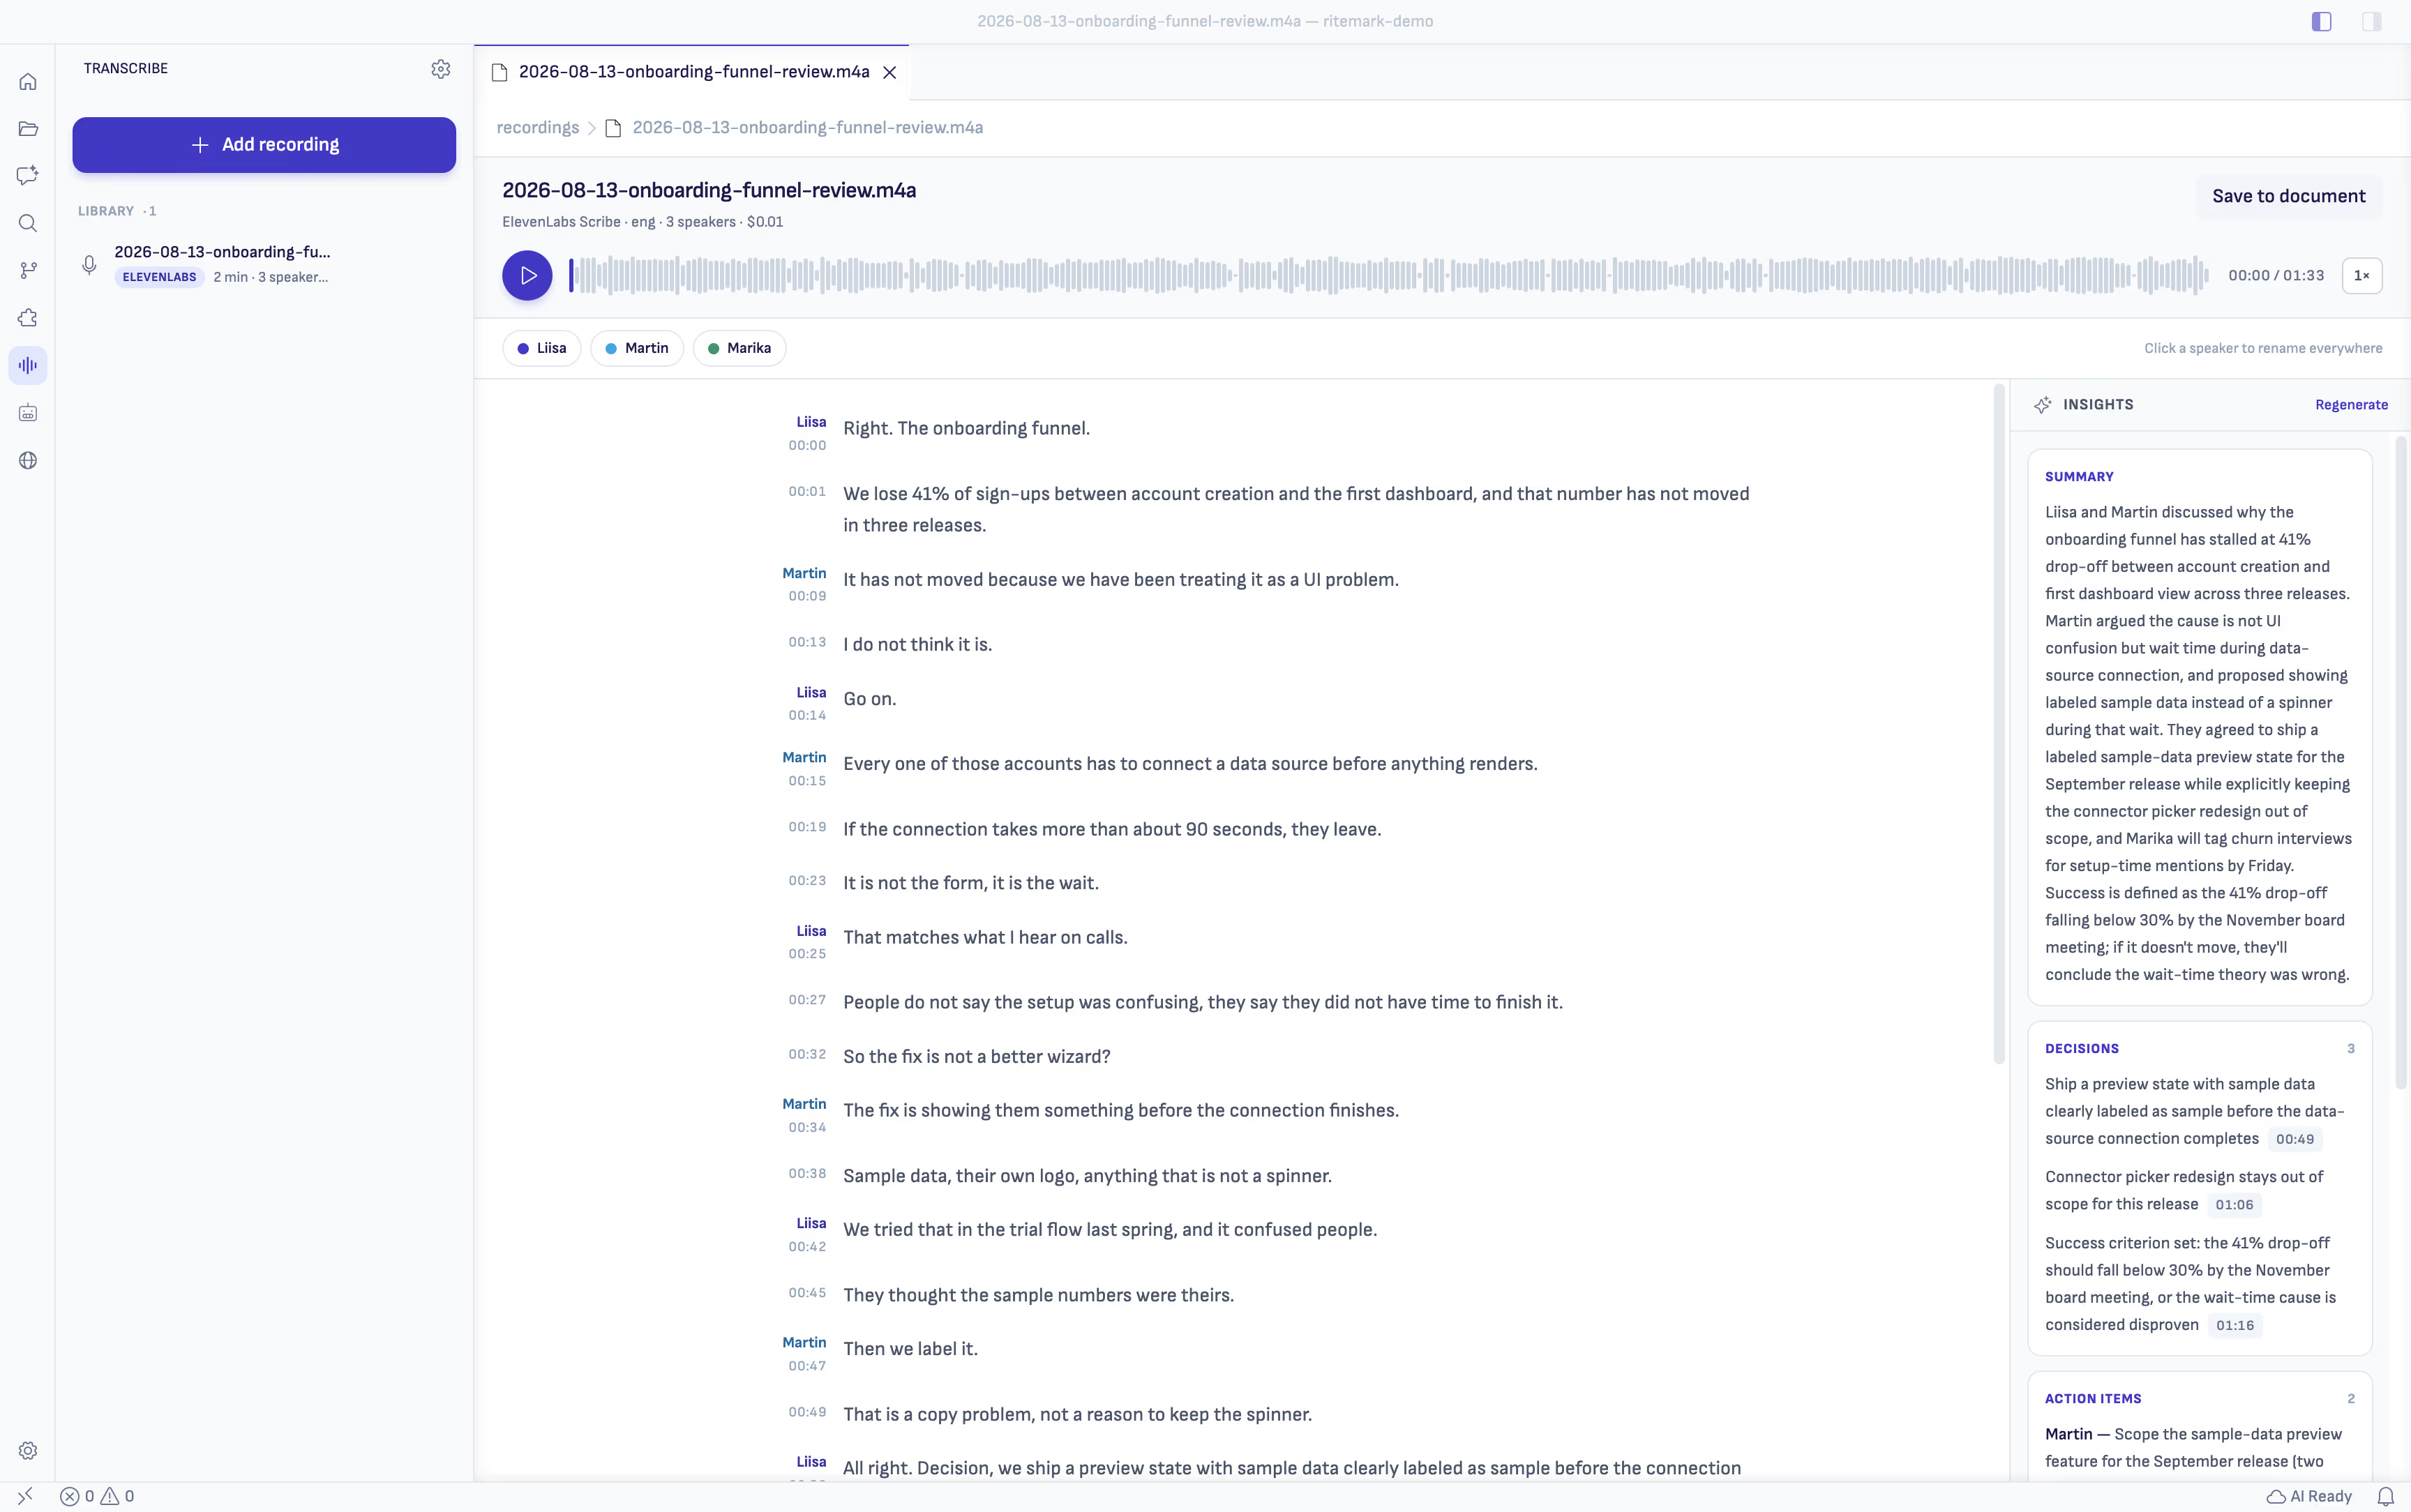
Ritemark can ask your AI agent to pull a summary, decisions, action items, open questions, and key quotes from the transcript. The transcript text goes to the AI provider you use, so this step is not on-device even when the transcription was. Every insight includes a timestamp that plays the source moment.
If an item can't be tied to a real transcript line, Ritemark leaves it out. You can check the recording before sharing a decision or assigning an action.
Save as Markdown
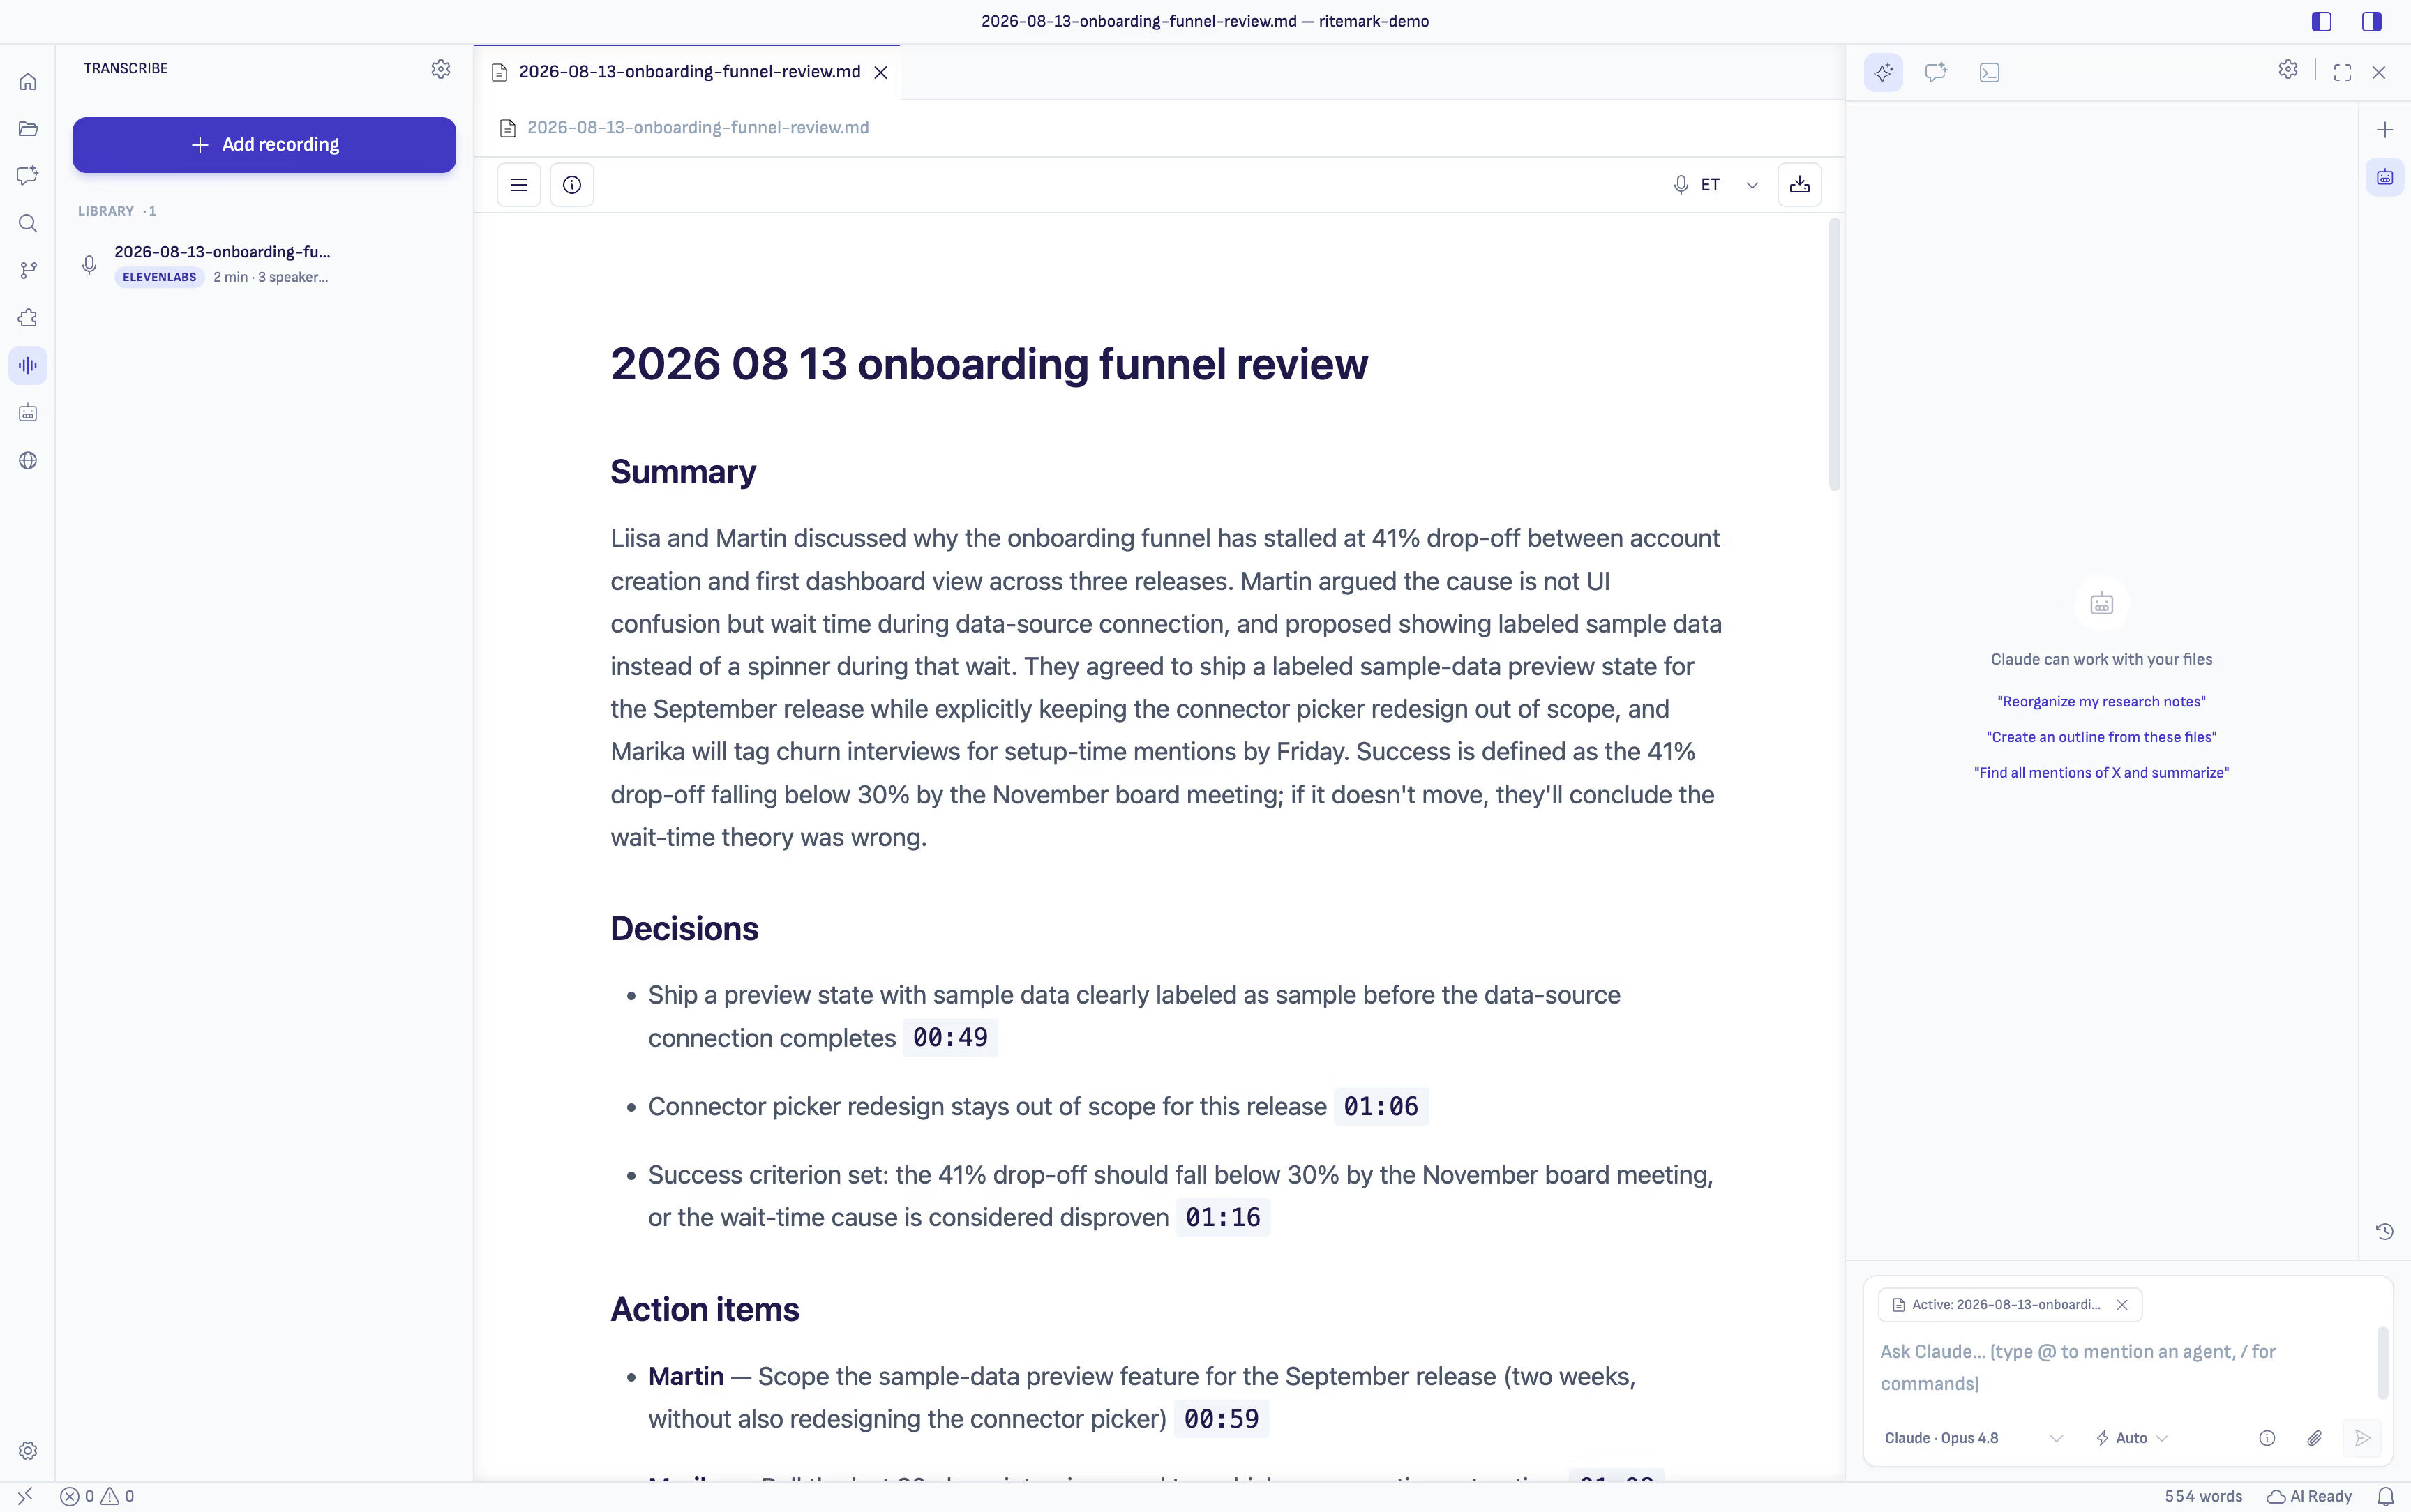
When the transcript is ready, click Save to document and choose a folder. Ritemark creates a Markdown file with front matter, speaker headings, and timestamps, then keeps the saved document linked in the workbench header.
The transcript also becomes the active file for the AI Sidebar. Ask an agent to summarize a topic, draft follow-up notes, or turn the action items into a plan. The agent works from the saved transcript, not the audio file.
Keep Long Jobs Under Control
You don't need to leave the Transcribe panel open. Processing continues in the background, and the Activity Bar icon shows progress. A 60-minute recording takes about two and a half minutes with local Whisper on Apple silicon, though timing varies by machine.
Canceling stops the job immediately. If Ritemark closes during transcription, the recording returns marked Interrupted instead of disappearing.
Find and Manage Recordings
Recordings belong to the folder where you created them, so one project's transcripts don't clutter another project. Turn on Show all projects to see recordings from every folder with their source labels.
If an audio file moves, relink it without losing the transcript. You can also inspect and clear stored transcript data in Settings.
Known Limitations
- On-device transcription requires Apple silicon and isn't yet available on Windows. Follow Windows on-device transcription for progress.
- Intel Macs use ElevenLabs. Finder may show the underlying VS Code version for the Intel app; About shows the Ritemark version.
- Windows SmartScreen may warn on first launch of the GitHub installer (
Ritemark-Setup.exe) while it builds reputation. Installing from the Microsoft Store avoids that. See Windows SmartScreen help.
Quick Reference
| What you want to do | How |
|---|---|
| Add audio | Open Transcribe → Add recording, or drag from Folder view |
| Record from your microphone (v1.12.0) | Open Transcribe → Record |
| Keep audio on your device | Choose On-device (Whisper) on Apple silicon |
| Separate speakers | Choose ElevenLabs Scribe |
| Check a passage | Click its transcript line |
| Find a word in the transcript (v1.12.0) | Type in the search field above the transcript, or press Cmd+F |
| Rename a speaker | Rename the speaker once in the workbench |
| Save the transcript | Click Save to document |
| See recordings from every folder | Turn on Show all projects |
Related
- AI Sidebar — Continue working with the saved transcript
- Core Editor — Edit and format the Markdown document
- Windows SmartScreen — Open the signed Windows installer safely