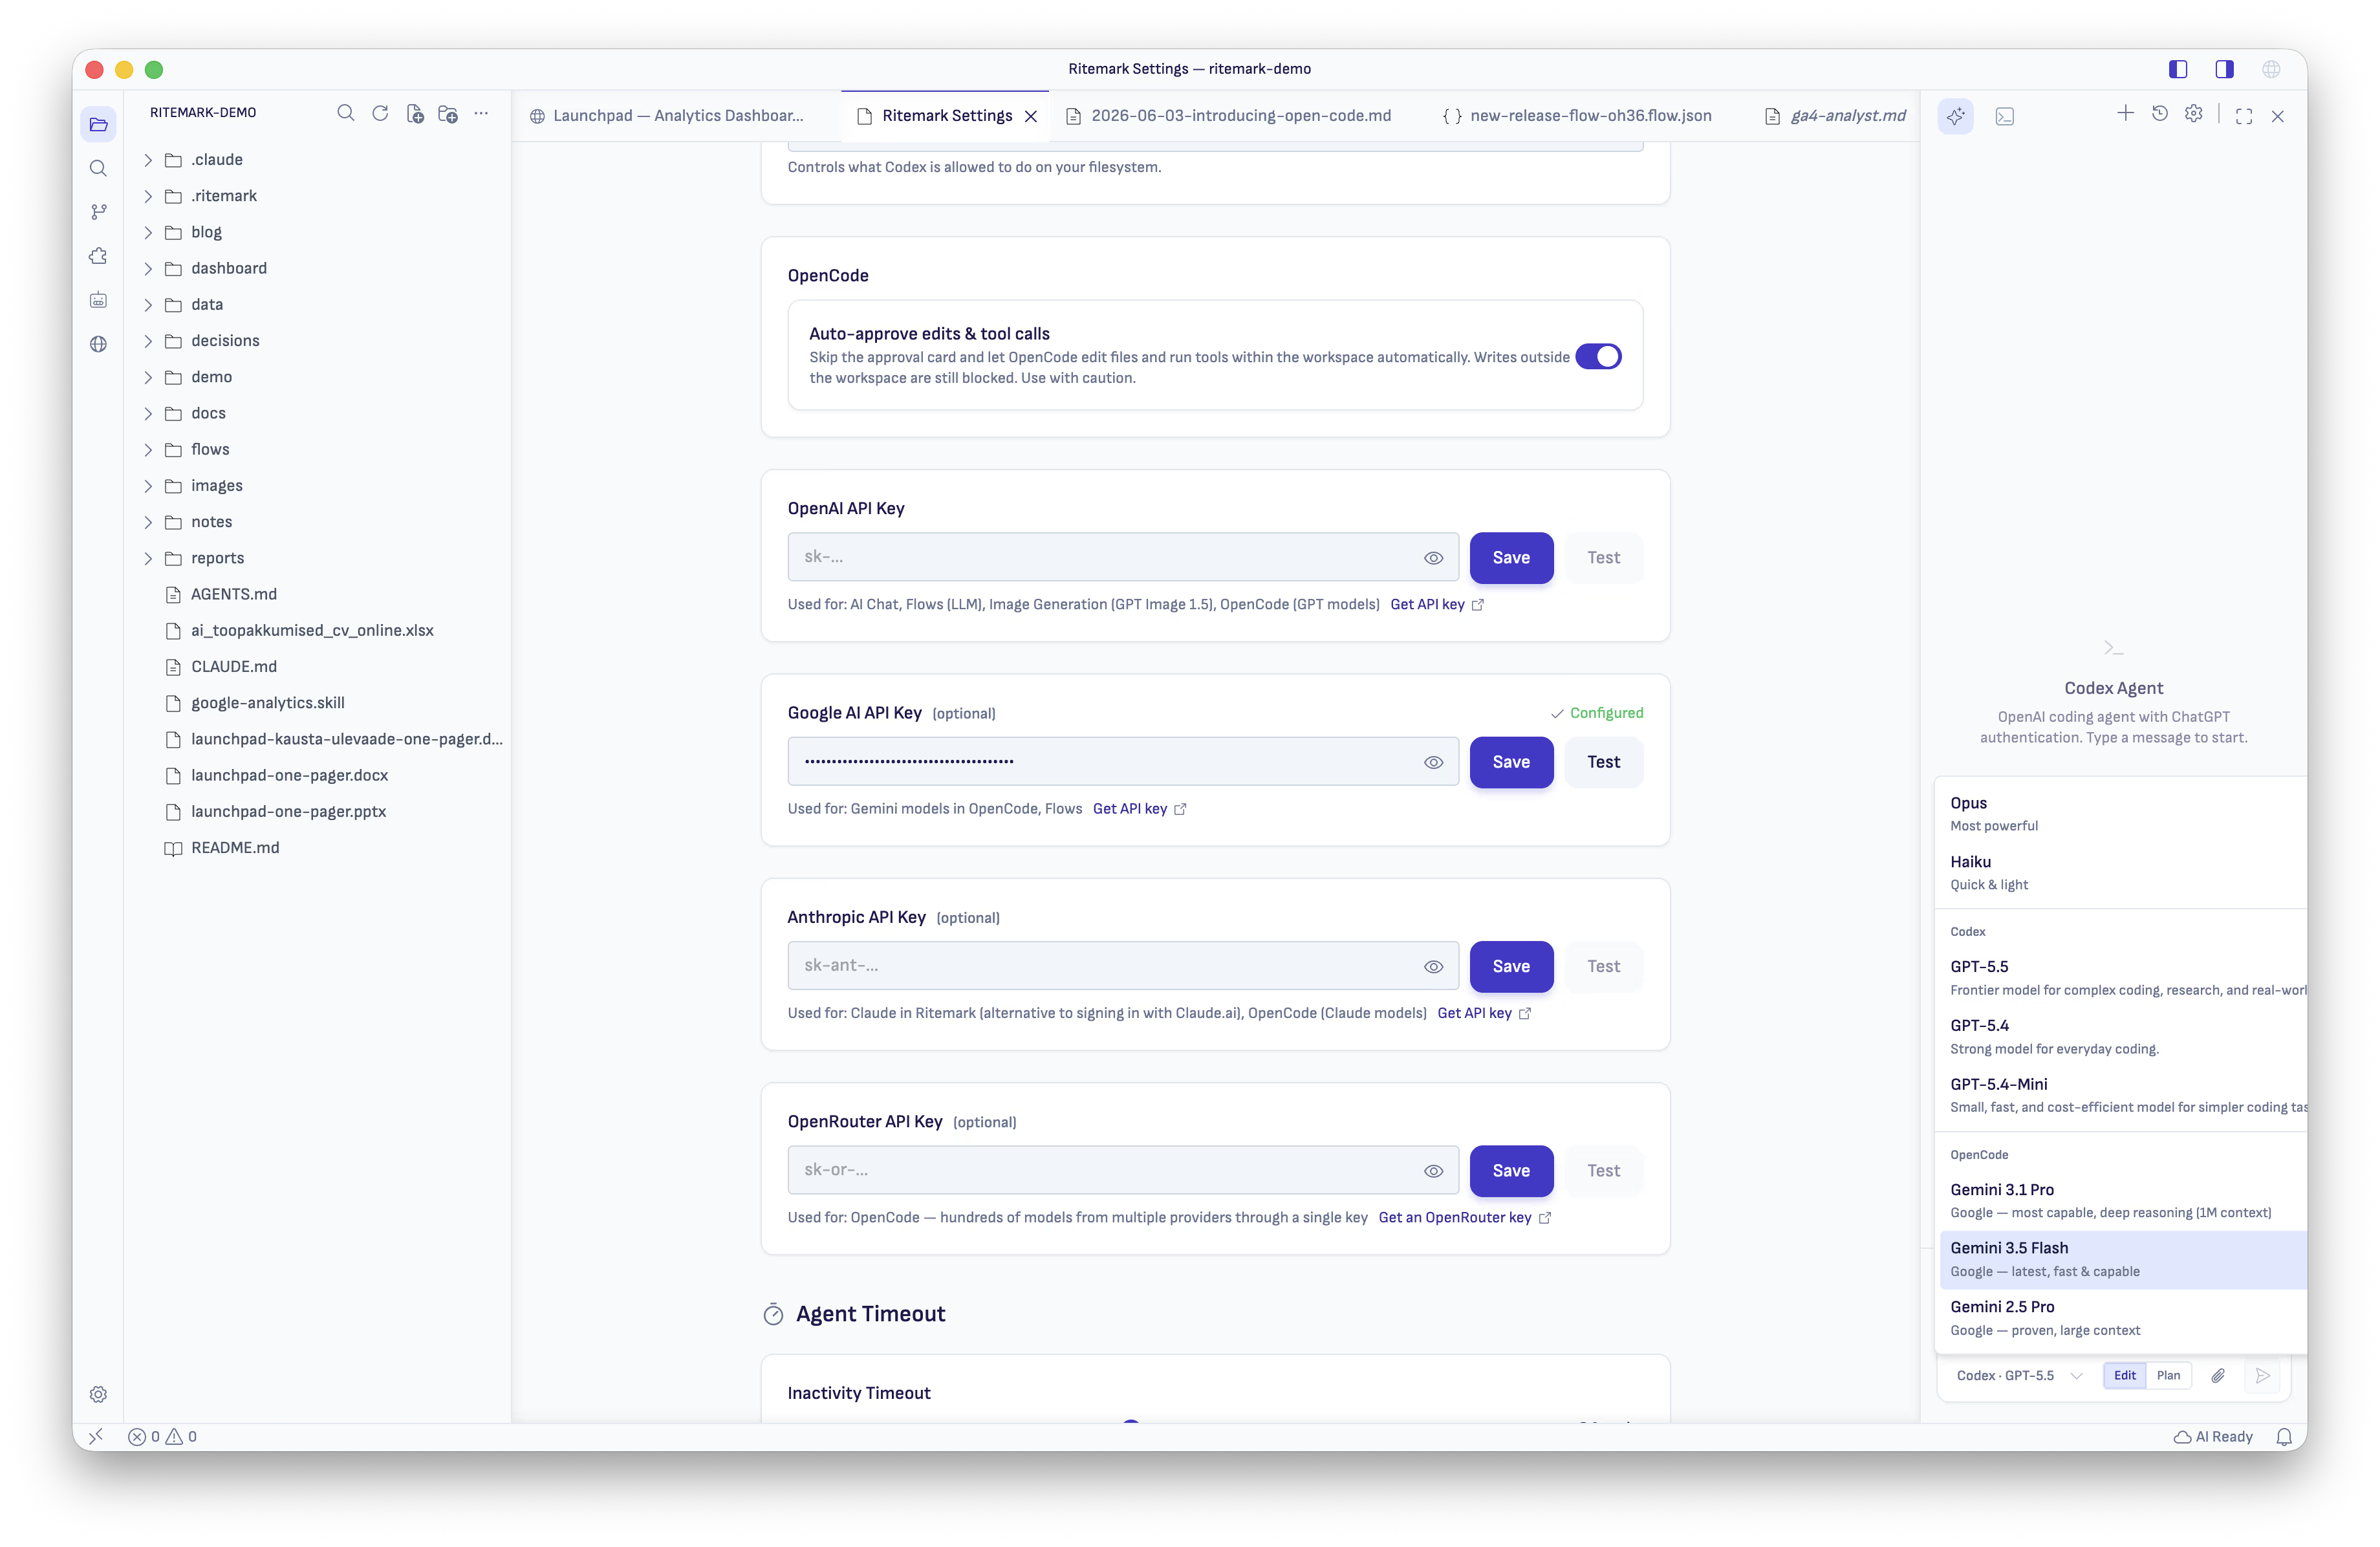
OpenCode is Ritemark's third AI runtime, sitting alongside Claude Code and Codex. The difference is the billing model. Claude Code and Codex sign in with their own accounts. OpenCode is bring-your-own-key — point it at any provider you already have an API key for and pick from that provider's models.
If you already pay OpenAI directly for API usage, or you have a Google AI key for Gemini, or you run an OpenRouter account, OpenCode lets you reuse those keys inside Ritemark.
What You Need
You need at least one API key from one of these providers:
- OpenAI — sign in at platform.openai.com, create a key under your profile menu.
- Google AI — keys are issued at aistudio.google.com.
- Anthropic — keys are issued at console.anthropic.com.
- OpenRouter — sign up at openrouter.ai; a single OpenRouter key gives you access to dozens of models across providers.
You can configure as many as you like. Only providers with a saved key appear in the model picker.
Step 1: Open Settings → OpenCode
Open Ritemark Settings (Cmd+, on macOS, or the gear icon in the activity bar). Find the OpenCode section. You will see four API-key fields, one per provider.
The OpenCode binary itself is already bundled with Ritemark — there is no separate install. It runs as a child process driven over the Agent Client Protocol (ACP), the same protocol Codex uses. On macOS, the bundled binary is re-signed under Ritemark's own Developer ID with hardened runtime, so it launches cleanly without Gatekeeper warnings.
Step 2: Paste Your API Keys
Paste each key into its provider field and press Enter or click outside the field to save. Keys are stored in your operating system's secure credential store — Keychain on macOS, Credential Manager on Windows.
The moment you save a key, the OpenCode group in the AI sidebar's model picker refreshes. You do not need to reload Ritemark.
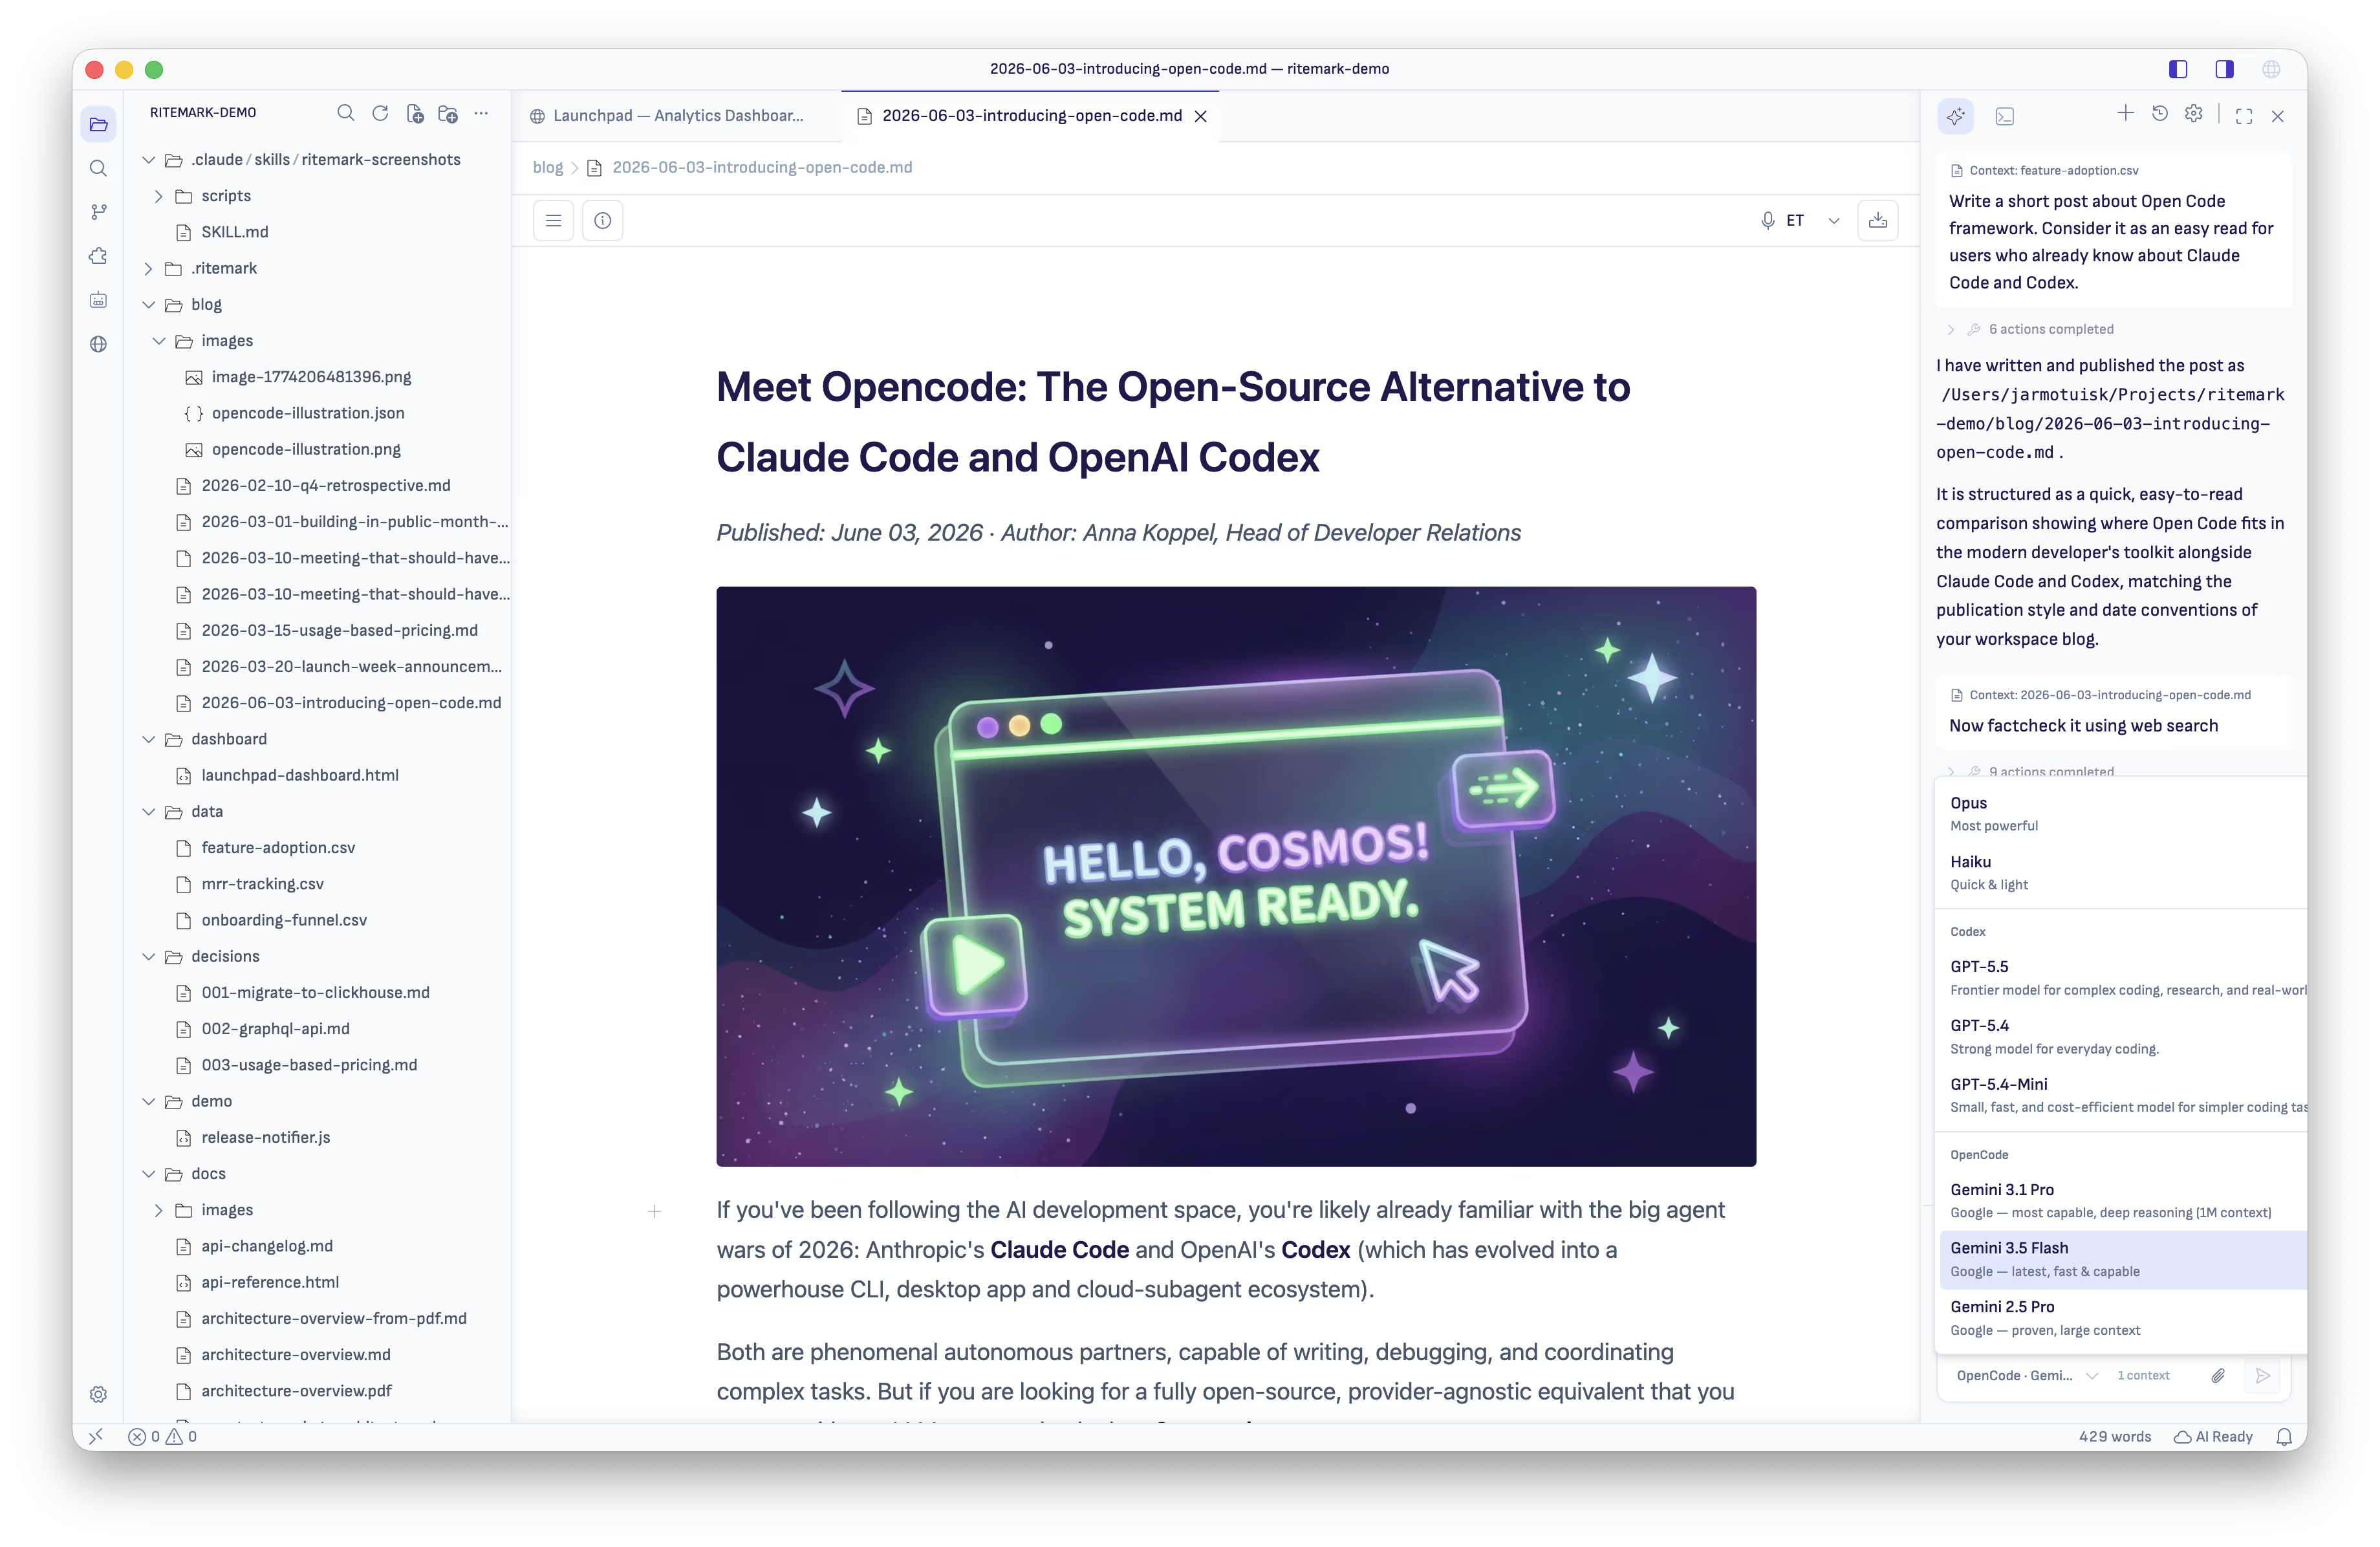
If no keys are configured, the OpenCode section in the model picker prompts you to open Settings instead of showing an empty list.
Step 3: Pick an OpenCode Model
Open the AI sidebar and click the model menu under the message box. You should see three groups:
- Claude — your existing Claude account models.
- Codex — your existing ChatGPT account models.
- OpenCode — every model from every provider you have configured.
Select any OpenCode model and start chatting. Responses stream in as you would expect. Reasoning is summarized as a small number of "Thinking" entries instead of hundreds of one-word activity lines, so the activity log stays readable. Tool calls appear as activities.
File Change Approval
OpenCode follows the mode you pick in the composer. In Auto, the default, edits inside your folder go through without a card. Choose Manual and, when OpenCode wants to edit an open file, you get a single File Change Approval card with the target path. The file on disk stays untouched until you click Approve.
This works the same way for every OpenCode-driven edit, regardless of which model produced it. In Manual, approval is per file change, not per session. OpenCode has no Plan only option.
Two important guard rails:
- Out-of-workspace writes are auto-rejected. OpenCode cannot write to a file outside your current Ritemark workspace. No prompt, no toggle — the write is blocked at the bridge layer.
- In Manual, approval is required even on small edits. A single-character change still produces an approval card.
Running Hands-Free (Auto)
When you want OpenCode to run hands-free, for example during a long refactor or a multi-file translation, keep the composer's mode on Auto, the default.
In Auto:
- Edits inside the workspace proceed without an approval card.
- Tool calls proceed without an approval card.
In Auto, this still holds:
- Writes outside the workspace remain blocked. Auto does not unlock that path. If you need OpenCode to touch files outside your project, you have to move them inside the workspace first.
Switch the mode to Manual when you want approval cards back. Settings → OpenCode still shows an older Auto-approve edits & tool calls toggle, but the composer's mode is what decides whether OpenCode asks.
What Each Provider Is Good For
A rough guide. Pick what matches your workflow.
| Provider | Strong for | Notes |
|---|---|---|
| OpenAI | General writing, code reasoning, fast turn-around | Current GPT models appear in the picker once your OpenAI key is saved |
| Google AI | Long-context tasks, multilingual content | Gemini's context window is generous |
| Anthropic | Same Claude models as Claude Code, but paid through your API key | Useful if you want Claude without the Claude.ai subscription path |
| OpenRouter | Trying many models from one key | Aggregates dozens of providers behind a single bill |
You can switch models mid-conversation. The conversation history follows the thread, not the model.
Privacy
Your API keys live in your OS credential store. Ritemark does not transmit them anywhere except to the provider you configured them for.
Each turn you send through OpenCode goes to the provider that owns the selected model. There is no Ritemark proxy, no Ritemark account, and no Ritemark cloud — the traffic goes directly from your machine to the provider you chose.
Troubleshooting
The OpenCode group shows "Add API keys to use OpenCode"
You have not saved any provider keys yet. Open Settings → OpenCode and paste at least one key.
A new key does not appear in the model picker
The picker should refresh instantly when a key is saved. If it does not, switch sidebars (Explorer to AI and back) to force a re-read. As of v1.7.3 the picker also re-reads on focus.
A model is rejected with "out-of-workspace write blocked"
OpenCode tried to write a file outside your current Ritemark workspace. Move the target file inside the workspace and retry, or rephrase the request so the agent works only inside your project tree.
macOS Gatekeeper warning when launching OpenCode
The OpenCode binary shipped with v1.7.3 and later is re-signed under Ritemark's Developer ID with hardened runtime. If you see a Gatekeeper warning, you are running an older version — update Ritemark and the warning goes away.
Quick Reference
| Action | How |
|---|---|
| Open OpenCode settings | Settings → OpenCode |
| Add a provider key | Paste into the provider field, press Enter |
| Switch to an OpenCode model | Model picker → OpenCode group → pick a model |
| Approve an edit (Manual) | Click Approve on the File Change Approval card |
| Run hands-free | Choose Auto in the composer (the default) |
| Block a write outside the workspace | Automatic — always on, even in Auto |
Related
- AI Sidebar — Switch between Claude, Codex, and OpenCode
- Agent Configurator — Configure any agent visually
- Setup Claude Code — First-time Claude setup
- Setup Codex — OpenAI Codex setup